Saturday, December 12, 2015

Dining Set Tutorial #4 Glue Up and Lower Stretchers

Lots of action in this blog. If you've been reading, you know I'm a better woodworker than I am a writer. Hopefully the pictures help. Ha!

Glue Up:


New town, new house, new shop. I've got the the chair parts laid out on my bench just as I left off this past summer. 

Monday, October 12, 2015

Reclaimed Dining Table with Dovetailed Breadboards, Part Two


Part two starts with the base. You can see I half-lapped some massive timbers in an "X". I marked the large dado, cut the kerf on the tablesaw, and cut the waste out on the bandsaw. Little tip: cut the dado slightly undersized, then make tiny passes with the jointer (or hand plane) on the side of the leg until you have a perfect fit.


Sunday, September 13, 2015

Reclaimed Dining Table with Dovetailed Breadboards Part One

Yikes! It's been a couple months since I've posted a darn thing. This summer I accepted a new job in management with the railroad, which involved relocating to a different part of Iowa. So, new job, new house, new shop... it's almost set up and ready to roll. In other words, I've been a little busy.

That said, I want to jump back and blog a cool project that I collaborated on with one of my best buds back in Council Bluffs. He's a painter who specializes in faux finishes and the like. One day he got a hold of some nice reclaimed barn wood and we started kicking around ideas for a dining table.

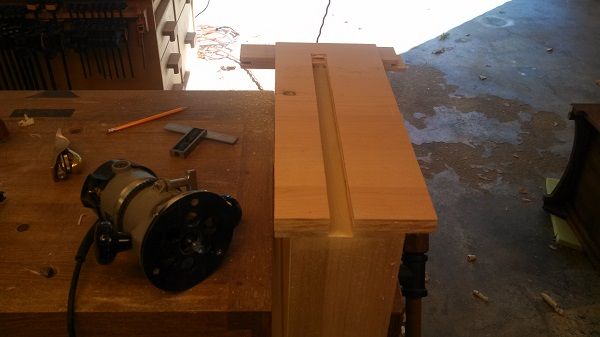
Over a couple of Newcastle Ales we narrowed down dimensions for the table. We also goofed around on the interwebz a bit looking for ideas. Per my usual, we stole various design aspects/ideas and came up with something we liked. With this particular lumber, I had the challenge of making odd-shaped, not-so-uniform boards and timbers and working them into the design and joinery. It all worked out pretty well......and here's how I did it.


Sunday, June 21, 2015

Dining Set Tutorial #3 Front Legs and Curved Back Rails

Front Legs


Finally, an easy chair part to make. The front legs are 1-5/8"x 1 -5/8' x 16"long. It's pretty easy to mill some 8/4 stock down to 1 -5/8" and rip them on the tablesaw. Ideally you'd use riftsawn stock (diagonal end grain) so that the grain looks similar on all four sides, like this:


Sunday, June 7, 2015

Dining Set Tutorial #2 Rails and Angled Tenons


Angled joinery is probably the most intimidating part of chairs. Ya, these joints take a little more time and skill, but the angles are necessary for a comfortable chair. I'll explain.

Design...

If you trace the outline of how we all sit, legs forward, it's not a square - more of a trapezoid. You can try to simplify a chair with right angle joinery and a square seat. My first chair was made this way (photo below). I found that design in a magazine gave it my best shot. It was good practice, but not the most comfortable chair. 
Sorry Woodsmith, this chair design was lame. 

Saturday, May 30, 2015

Dining Set Tutorial #1 - Design Process and Back Chair Legs.

A dining set is quite an undertaking for any woodworker, but I seem to enjoy the challenge. There's a few folks who requested that I blog my process so this my attempt to oblige. Now, this won't be completely comprehensive, but it will show each step and point out things I think important. That said, I try new methods and learn new things with everything I build, you'll get to see some of that too.

Design...


Here we go. After getting a good idea from my aunt and uncle (whom I call "clients" for the rest of the blog, to keep it all professional-like) of what they'd like as far as wood species and design, I set out to designing the rear chair legs. My clients fancied the chair legs in this picture:

Photo from Branchhill.com

Tuesday, May 19, 2015

Brass City Records and Toolworks- The Leader of the Band Has Died


I was on the road to the Handworks show in Amana, Iowa when I received word that Walt Quadrato had lost his battle with cancer. Walt was the owner of Brass City Records and Brass City Toolworks in Waterbury, Connecticut. I can't say I knew that man well, but I considered him a friend. It's interesting the grief, the sting of loss you can feel for someone you've never met in person.


Walt was one of those people who left a lasting impact on nearly everyone he came in contact with. His love for music and vintage tools was contagious. His kindness and integrity was second to none. For local musicians, vinyl record and vintage tool lovers alike, Walt wasn't just a man, he was an institution. Walt must have had the digs on every flea market within a couple hundred miles. He would dig up the bargains, all the hard to find items, and pass them onto us. Of course, he made money doing this, but his markup was always reasonable. He priced tools so that the average guy could afford them and we woodworkers were especially grateful.

Sunday, May 17, 2015

Handworks 2015 and Mr. Studley

I had a great weekend attending the Handworks event at the Amana Colonies. Being a furniture maker in Iowa, a show like this is simply too good to pass up. 

This picture prior to opening speaks to the success of the event before it even started. Obviously there are a lot of woodworkers in the midwest, and we were all excited about this event.


To begin each day it was pretty crowded in the big barn. My wife said it was filled with "man stink." (snicker) I found it wise to come back later in the day if you really wanted to visit with some of the toolmakers. 

Friday, April 3, 2015

Tour of a Rural Iowa Sawmill

Recently while making a trip to one of my favorite little mom 'n pop sawmills, I decided I'd snap some pics to share with you all. Something tells me not every woodworker gets to see something like this.

The sawyer's name is Paul and we've become friends. He's in his mid 70's now. How he keeps this place in operation by himself is beyond me. Paul always enjoys when I bring him pictures of the furniture, benches, and whatever else I make with his lumber. I could see how that would be rewarding for a him.

Of course his prices are pretty good since we're cutting out the middle man. That said, some woodworkers don't like this type of lumber source because they only want select grades. There's a lot more common grade wood in a log than people realize. I have no problem working around/with defects, especially when the lumber it's priced correctly.

Here goes. Entering a "hardwood farm" that has been in the same family for over a century.


Friday, March 13, 2015

The Making of Heather's Tea Shelf


This week I finished a teacup display shelf for my wife. The shelf was heavily inspired by an Arts and Crafts shelf I saw in Fine Woodworking a few years back. Basically, I took that design and made several changes to suit my wife's taste's and needs (specific tea set dimensions).

Her shelf is much larger than the one in the magazine, about 48"x 30". And it's made of curly maple instead of oak. The show faces are actually some "musical (instrument) grade" maple I was able to acquire. Here's some shots of the build...


The columns were mitered and edge glued with the nicest pieces of stock I could muster.

Sunday, March 1, 2015

Mortise and Tenon Joints (Mortising Machine and Dado Blade Method)- A Tutorial

Ok, here’s how I make mortise and tenon joints with a dado blade and mortising machine. My zeal for hand tools aside, I can’t get away from this method. It’s just so darn efficient and consistent in results.

Most of us have a tablesaw. Benchtop mortising machines are pretty good for what they do. Better yet, they're affordable compared to most woodworking machines. It's not uncommon to see them on the used market either, Good thing, I can’t imagine making a set chairs or anything with a plethora of M&T joints without one.

Thursday, February 26, 2015

An Inheritance

Most folks can appreciate when wonderful tools are passed down from previous generations. I hadn't really counted on an inheritance myself. I never met my paternal grandfather, nor did I care to. My father passed while my mother was pregnant with me. Shamefully, when my mother went to collect my father's tools from the foundry where he worked, his co-workers had already looted his toolbox. Nice. So, I took silly pride proclaiming that everything in my shop I had worked for, and paid for myself. You'd think I would would have learned by now,  every time I puff out my chest I'm setting myself up to be humbled.

My wife and I moved to the midwest about a decade ago. I soon learned I had a great aunt and uncle whom I'd never met. This would be my paternal grandfather's youngest brother. To our delight, Wayne and Ethel are wonderful, salt of the earth folks. And wouldn't you know it, Wayne is a woodworker too. He mostly makes wooden toys that he donates to churches, fundraisers and the like. Not just any wood toys either. Wayne made complete functioning train sets, airplanes, and so on.


Unfortunately, I got to know Wayne just as his woodworking days were winding down. He was in his 80's, his eyesight was getting worse, and he no longer trusted himself with power tools. Poor fella had to start living his woodworking dreams vicariously through me. He didn't seem to mind. He's very proud of my shop and the the furniture that has come out of it. And I have to say, I have a renewed pride in my heritage after spending time with him.

Fast forward to this year. Wayne and Ethel are selling their homestead and moving into an assisted living apartment. I was honored when their daughter offered some woodworking tools that had been in the family for generations. I know some of my woodworking friends enjoy this sort of thing too, so I thought I'd share.

Saturday, February 21, 2015

Solid Wood Drawer Slide Install- A Tutorial

Alrighty folks, I'll try to ‘splain my wood drawer slide process.

First, find some sort of hardwood in your rack or cutoff bin that would be good for the slides. I used some 5/4 red oak in this case. Hard maple would be even better. 

Then, I make a jig out of scrap plywood and brads. I like to "sandwich" the drawer slide piece(oak in this case) between the plywood scraps. Then I nail it with a crosspiece and edge runners on the underside (pic below). This makes the jig the exact width you need.

Also, I make it so the groove is centered on the drawer side. This way the same jig will work on both sides of the drawer. With your jig made, rout out the groove with a pattern bit.


Routing with the jig in place.


Friday, February 20, 2015

Shop Blog Part Two: Decking it Out, Making it MIne

This is part two of my shop remodel. If you missed part one, you can find it here.


Where were we? It’s the summer of 2013 and I had just finished up my lumber rack. A few other woodworkers gave me grief for using 8/4 oak for that build. Lo siento, it's very reasonable where I live. So, just to rub it in, I was about to "waste" a lot more white oak and walnut in my shop (snicker).


After I moved all that stuff into my new shed, I had a big empty wall in the back of my shop. I sorta missed the ugly old construction lumber bench I had moved into my shed. But I had big plans for a joinery bench in that space back yonder.


Thursday, February 19, 2015

The Crohn's Curse

Preface: Along with the woodworking madness, I’ve decided to author a few personal blogs. Personal, meaning I’m likely to ramble about my faith, my family, and just about anything else that relates to “worker” as opposed to the “wood.”
I suppose, in a way I’m relating to the throngs of online bloggers out there. It’s a form of expression. Perhaps a way to organize thoughts that seem stuck in my head until I can write the down. I don’t even care if anyone reads this stuff. I just know I need to write it. 


The Past….


In college I met this beautiful girl named Heather. Lucky for me, she was just as taken with me as I with her. We were dating within days of meeting, and we have been inseparable ever since.

Late in our college years she got sick, real sick. The doctors in our little college town were pathetic. A year went by without a diagnosis, so she was in pretty bad shape by the time her parents had to take her back home for some proper care. Diagnosis: Crohn’s disease.

Basically it’s an autoimmune disorder where your immune system inappropriately attacks your own digestive system. The attacks cause ulcers throughout your digestive track and wreaks all kinds of havoc on your body. There is treatment, but no cure (yet!).

Shop Blog Part One - How My Little Slice of Heaven Came to Be

My woodshop is really an extension of our home. I think my kids enjoy it as much as I do. Here's the story of how my little slice of heaven came to be. Just don't call it a garage (chuckle).

I don't have any great "before" pics. You can see my shop in the background of our activities. About five years ago; a tablesaw, drill press, a bench, and my little buddy.


Wednesday, February 18, 2015

Solid Bookmatched Furniture Panels- A Tutorial


They seem simple, but there is some technique to achieving great looking bookmatched panels. On a piece like this blanket chest I'm working on, I always start with the panels. They get the choice cuts, and I want to have some flexibility on the project dimensions depending on how the panels are turning out.